PART 5 (FINAL)
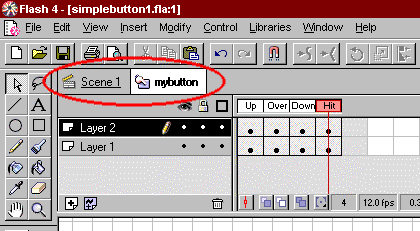
Defining the Clickable Area
The last frame, labeled "Hit" is special. It is simply used to specify the area that triggers mouse-events.If you leave this frame blank - then mouse events will be triggered when the mouse moves over the visible button.
But if you draw an area that is bigger than the button - then the mouse event will occur as soon as the mouse gets even close to the button. On the contrary you can draw an area that is smaller than the button, so that mouse events are only triggered when the mouse is at the center of your button.
However, the real power of the "Hit" frame is a bit more sophisticated.
If you draw something in the hit area that is outside the area covered by the visible button - then the button will react to mouse-events in the Hit area. That means that you can make something happen on one part of the screen when the user moves the mouse over another part of the screen.
Adding Actions to the Button
The button we created so far is still in the Button object editor. We still haven't dragged it onto our main movie.If you look above the timeline you see two Icons labeled "Scene 1" and "mybutton".
1: Click the "Scene 1"-icon to return to the main movie.
2: Click on the button in the Library window and drag it onto the movie.
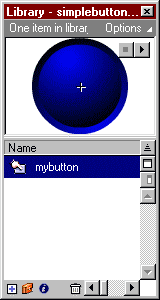
If your Library is not visible choose Window->Library (or press Ctrl-L) to make it visible.
3: Once the button have been placed correct in your movie right click on it and choose "Properties" in the menu that appears.
An Instance menu appears.
4: Select "Actions"
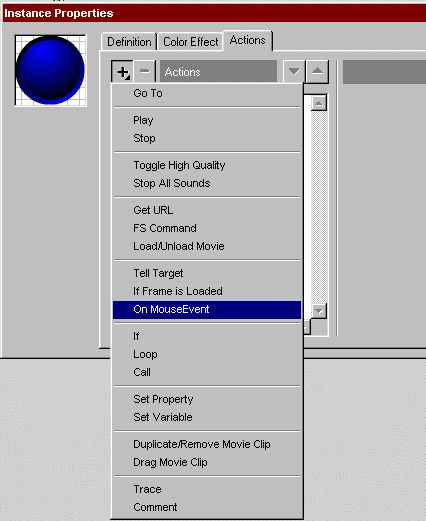
5: Click the plus Icon and select the "OnMouseEvent" option.
6: Select "Release" in the list of event triggers.
The action now says:
| On (Release) End On |
This means that we have told Flash that it should react on a mouse-click release event.
But we still haven't told what should happen when the event is detected.
We have several options available. The most important ones are listed below:
Jump to another Frame
Click the plus once more and select the "Go To" option.
Now, the action says:
| On (Release) Go to and Stop (1) End On |
Eventually use the options to specify the frame you want to jump.
If you don't want the movie to stop, once the jump has been made, you should select the Go to and Play option at the bottom.
If, say, you entered frame 20 and selected the Go to and Play option, the action would be:
| On (Release) Go to and Play (20) End On |
And the Instance menu would look like this:

Load another page
Instead of jumping to another frame you could make the button work as a normal hyperlink.
Click the plus and select the "Get URL" option.
Now the action says:
| On (Release) Get URL ("") End On |
If you enter http://echoecho.com in the URL field the action looks like this:
| On (Release) Get URL ("http://echoecho.com") End On |
Controlling Windows to Load URL
You can control which window the URL should be loaded into.In the Window filed you have four options:
- _self : Opens the URL in the current window. (Same as if you did not specify any window)
- _blank : Opens the URL in a new window.
- _parent : Opens the URL in the parent frame (only works with framesets).
- _top : Opens the page in the current window - if it's a frameset all frames are cancelled.
| On (Release) Get URL ("http://echoecho.com", window="_blank") End On |
PASSING VARIABLES TO THE URL THAT IS LOADED
The last option, "Variables" allows you to pass variables from the flash movie to programs running on the server.
If you choose either "Send using GET" or "Send using POST" Flash will open the specified URL as if it was requested by a form-submission. We will not cover the subject further here, since it really belongs to the more advanced tutorial on Flash programming.
When you're familiar with the simple buttons explained on this page you are ready to proceed to the more advanced buttons that are based on Movie clips.
The following two pages will explain the powerful techniques behind these buttons.
Advanced Buttons
CREATING ANIMATED BUTTONSA button like the one you see above can be created by simply inserting a movie-clip in the "over"-frame of your button-symbol.
That is:
1: Create a normal movie-clip that does whatever you want to happen when a mouse over is detected on the button.
2: Create a normal button symbol (explained on the previous page).
3: Insert a keyframe in the "over" frame of your button, and place the animated movie-clip in this frame.
This will cause the animation to start when a mouse over is detected and disappear again when a mouse out is detected.
The problem with this type of button is that it lacks "intelligence". The animation disappear in the middle of a sequence as soon as the mouse-out event is detected.
Look at the button below instead:
CREATING TELL TARGET BUTTONS
The advanced button will finish the loop cycle before stopping the animation.
The trick is this:
1: Draw a button graphic.
2: Create a button symbol using the button graphic.
3: Use the exact same button graphic to create a movie-clip.
4: In the movie-clip: Create whatever animation you want for the button.
Now you have a button-symbol with the fixed button in it AND a movie-clip with the entire mouse-over-animation in it.
5: Place the button-symbol in your movie.
6: Add this action to the button:
| On (Roll Over) If (dummy=0) Begin Tell Target ("/animation") Play End Tell Target End If Set Variable: "dummy" = 1 End On On (Roll Out) Set Variable: "dummy" = 0 End On |
The action detects a Roll Over and a Roll Out:
| When a Roll Over is detected: - it tells the movie-clip to start playing (The movie-clip plays the animation we want when a Mouse Over is detected.). At the same time it sets a variable named "dummy" to the value of 1. When a Roll Out is detected: - the variable named "dummy" is set to the value of 0. Nothing else happens here - and THAT is the trick in all this. |
The movie-clip simply continues to play after the Mouse Out is detected - and that is exactly what we wanted. When the movie-clip finishes an animation cycle it will be at the last frame of the movie-clip, and this is where the "dummy" variable comes into the picture.
In the last frame of the movie-clip we have this action:
| If (/:dummy=1) Go to and Play (2) Else Go to and Stop (1) End If |
This means that the movie-clip is using the "dummy" variable to determine whether it should continue (Go to and Play (2)) or it should stop (Go to and Stop (1)).
To summarize:
| 1: We have a Button symbol that we use to detect for Roll Over and Roll Out. 2: On top of this button we have a Movie-clip symbol that actually plays the animation we want when a Roll Over occurs. 3: When a Roll Over is detected on our Button symbol we tell the Movie-clip Symbol to start playing. At the same time we set a variable called "dummy" to a value of 1. 4: The movie-clip will play the entire loop, and when it reaches the last frame it will check the current value of the "dummy" variable. If it is 1 it simply repeats the loop again from frame 2. If it is zero it goes to frame 1 and stops. 5: When a Roll Out is detected the "dummy" variable is set to zero which will cause the Movie-clip symbol to stop next time it completes a loop. |
Now that the technique behind Tell Target Buttons is in place we just need two tiny comments to it:
First:
We need to add a Stop action to the first frame of the Movie-clip symbol - otherwise the movie-clip will start looping as soon as it is loaded - rather than stop and wait for a Roll Over event.
Second:
The Movie-clip symbol must be given an instance name.
Instance names are entered in the "Properties" dialogue box for your clip.
If you look at the action that we added to the button, you will notice this line:
| Begin Tell Target ("/animation") |
"animation" is the instance name of our Movie-clip.
The reason that Flash requires instance names for movie-clips is that the same Movie-clip symbol could easily be used in several places at the same time.
For example you could create a movie clip that animated a ball jumping up and down. This movie-clip could easily be inserted twice so that you had a ball jumping both at the left and right side of the movie. If you did not add a unique name to each of these two clips it would be impossible for flash to know which one you wanted to control when referring to the movie-clip.
The technique for Tell Target buttons is fairly complex compared to the technique behind simple buttons.
Fortunately, it sounds a lot more complex than it actually is - which you will realize when you get your first Tell target button running.
Flash Tweenings :
INTRODUCTION
The term "Tweening" is derived from "in between". Sometimes you want to add an effect that is graduated over several frames. For example, moving a car from the left side of the movie to the right side. Instead of moving the car a little bit on each frame, you can simply:- position the car on the first frame,
- then insert a keyframe where the car should stop
- and finally tell Flash to tween between the two key-frames.
Motion Guide Tween
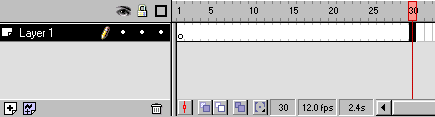
Do the following to make a Motion Guide Tweening.1. To insert 30 frames in your movie with the mouse:
Click frame 30 in layer 1 on the timeline - then press F5.
2. Now you need to find the element you want to tween.
( It can be any element you like ) .
Choose Libraries > Graphics in the menu.
Library - Graphics opens.
Find Bird and with the mouse, drag it into the canvas.
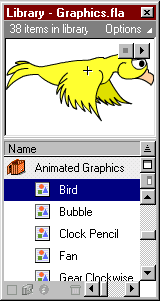
Use the scale tool in the toolbox, to resize the bird as you like.
(If your version of Flash does not contain "bird", then just use any other symbol).
3. Now enter a keyframe in frame 30. To do this, first click
frame 30 in layer one on the timeline. Then press F6.
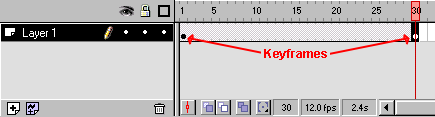
4. Next, double click the keyframe in frame 1.
A frame Properties Box pops up.
Choose "Tweening", and in the Tweening drop-down menu choose "Motion".
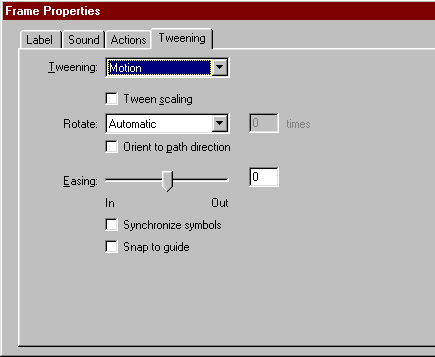
Click OK
5. Right click on Layer 1.
A pop-up menu appears.
Choose Add Motion Guide.
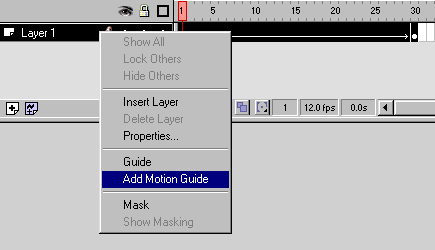
Flash now inserts a new layer on top of layer 1,
with the Motion Guide icon to the left of the layer's name.
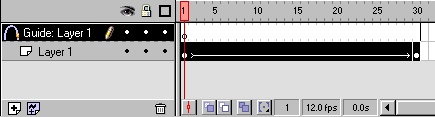
This new layer is called a motion guide layer.
Motion guide layers are used to draw lines that you want an animated symbol to follow.
6. Click on the Motion Guide Layer to make sure it is the active layer.
(Click on the layer name, where it says "Guide: Layer 1").
Choose pencil
Make sure pencil mode is set to "Smooth".
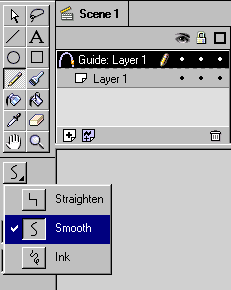
With the pencil draw the line you want the bird to fly along.
For example like this:
(Hint: Do not make complex patterns until you're familiar with the technique).
7. Now adjust the frame pointer so it points to frame 1.
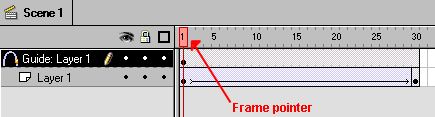
Make sure the Snap button
View > Snap in the menu, to activate snapping).
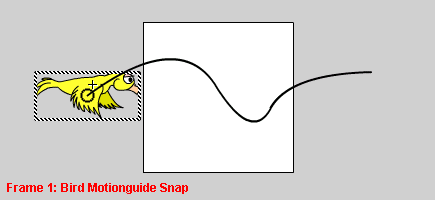
8. With the mouse, place the bird so that its center is at the beginning of your motion guide.
(The center is indicated by a small + when selected).
A black circle appears when the bird is attached to the motion guide.
It can sometimes be hard to get the symbol to snap to the guide. Eventually it will though :o)
Try zooming in or out if you just can't get the bird to snap to the guide.
Release the mouse button when the bird is snapped to the guide.
Now adjust the frame pointer so that it points at frame 30. Repeat the process
placing the bird at the end of the motion guide.
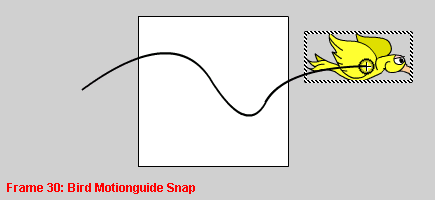
Congrats! You have just created .... (drumrolls)...... a Motion Guide Tweening!
The bird will now follow the motion guide when you play the movie.
Press Ctrl+Enter to test your movie.
Orient to path direction.
If say, your motion guide was a circle, you would have the bird fly in a thrilling loop.
However it would look kind of odd, since the bird would only follow the circle, but not
actually point the nose in the direction of the circle.
During the entire loop the bird would have its head pointing to the right :o)
Eventually the bird would fly backwards. Quite a thrill maybe... but .. not too realistic :o)
If you want the bird to actually follow the circle, not only in movement, but also in direction,
you should double click the keyframe in frame 1 on layer 1.
This will reopen the frame properties box.
Choose the "tweening" option.
Select the "Orient to path direction" option, and click ok.
CONCLUSION:
You now have the basic skills of a Flash master. But remember: You don't create great Flash animations by bombarding your users with each and every one of these skills all at once. Stellar Flash animations come from the elegant implementation of the right features. Many of the movies at Animation Express use only the most basic Flash techniques to showcase exceptional content. In fact, additional buttons and complex actions would only spoil many of these works. When sophisticated interactivity is indicated, go ahead and utilize every feature in your arsenal, but make sure you do so with a light touch. This is something that comes only with practice. So get to work! There are a lot of excellent Flash resources. Here a few of my favorites: Colin Moock's Flash Page Flash Central Macromedia's Flash Support and Developer's Center Also, there's a an active and useful mailing list called Flasher-L that you'll find highly valuable.The above, credit should goes to Techi Warehouse we recommend you to find out more over tutorial from there
No comments:
Post a Comment