Showing posts with label Layer Style. Show all posts

23 May 2011

Photoshop Tutorial: Cool earth effect

In this tutorial you will learn how to make an effect by using Filter Tools and Layer Style the only special Tool is Brush Tool which I used to inform in my previouse tutorials. In this tutorial as well some of the tchniques I used I took from other tutorial so I recaped it and make you easy to understand which I recommand you to read this tutorial one by one step.

Step 1: make a black background size 10cm x 10cm res: 72.

Step 2: make brush preset. Press short cut (M) to draw a a line and create a new layer fill in gray color. Go to Edit menu choose Define Brush Preset... do like this is to make a brush by your own style. Name your new brush and go for setting. See image below

Step 3: Brush setting. In Brush Preset choose your brush and go to Sharpe Dynamics adjust the size to 50%.  Ticket the Scattering choose scatter 365% and go to Color Dynamics set all in 50%


After that create a new layer and start brush it as seen.

Once you are ready then go to Filter menu => Blur => Motion Blur in the option box set as 90 for Angle and 155pixels for Distance.
here we have after motion blur.
Step 4: use this image to make the earth effect. you also can download it here (http://ieslaroda-bilingue.wikispaces.com/file/view/blue-planet-earth.jpg/98707105/blue-planet-earth.jpg). Then tag it to our work and rotate as seen.
use Elliptical Marquee Tool draw a rounded and move to buttom of our work document. Then inverse this selection and delete the rest of earth.
and now reload selection this earth layer by go to edit menu => load selection. Hide the earth layer and delate the brush layer in our selection area. Press Ctrl + D to unselect and use the Eraser Tool to erase part of prush layer.
Remember after select the Eraser Tool in the properties box above there choose a small blur one and reduce the opacity to 50% and start erase the brush.
Step 5: applying Gradient Overlay to this brush. Use normal Blend Mode but your Gradient must be in multi color. I choose Red, Yellow, Blue and Black.
Step 6: unhide your world layer and apply layer style. Now firstly apply Inner Glow in the Blend Mode go to Hard Mix and opacity 75% in red color then size is fully 250 px.
Agian in the same box apply Outer Glow. Blend mode Color Dodge. Opacity is 75% size only 87 px.
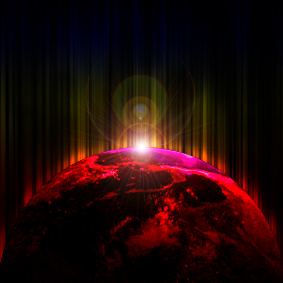
Here result.
Step 7: this should be last step to complete this tutorial. Create a new layer as seen below fill in black and go to Filter menu => Render => lens Flare. In this Lense option box adjust the brightness to 100 and choose the lens type 50-30mm Zoom. In the Layer Blend Mode make it as Screen. Finally go to Image menu => Adjustment => Lavel and adust as Channel => RGB Inputs Levels => 25 1.00 255.
Finall Result: there are lots of ways to create this effect, and lots of good tutorials showing how to create that type of brush tools, Filter or layer style. But this tutorial is another new way to make a new style and I hope you enjoy it.

30 August 2010

Awesome fire effect for 3D text (Photoshop)

This tutorial is going to be a little more advanced than the other ones I have done. It shouldn’t be a problem if you have been following along with our other tutorials or have a grasp of Photoshop. As my previous post I also shown on How to Create a Stunning Fire Effect In Photoshop . So lets begin.
Open up your Adobe Photoshop and make a new document (Ctrl + N) size: 10cm x 10 cm resolution : 72pixel and black background color.

Press T to start typing text. Type F in the meaning of FIRE. Just look to the right of your work space you will see a new layer of this latter F then right click on it => Rasterize Layer. Do like this your text will become an object and do remember that once you Rasterize it can not be re-edit as text.

Transform this F and right click again => Distort then try to make this F as seen in below image.

Then download this image. We will use it from now as a background and fire effect and name it as BACKGROUND IMAGE.
After download finish bring it into your work place and make a copy by select this image all and Ctrl + C.
Load latter F selection now press Ctrl + Shift + V to pass the image as a layer mask.
Here we got
Press Pen Tool to start draw 3D.
Draw this 3D until you finish. Then it should be look like this
Merge all layer together (select all layer and Ctrl +E). Look to your layer and adjust the color to Linear Light
Then you 3D latter F will look like below
Use the background image this time and put a layer mask and Ctrl + U to adjust color into it as seen. If you're all are misunderstanding this part please leave me below comment or contact me for my fatest reply.
Alright now what to do?
Use your Pen Tool again but this time we are making shadow of latter F. To make it easy way just copy this merge latter F and give a black color on it then => Filter => Blur => Guassian Blur
Do the same to all latter as we F now continuous to I, R, E and place those latter some thing nicely.
It is time to make some fire effect and it should be the last step. Download these fire and bring all to your work place.


Let take one of it and make layer mask to cut all black background. It is hard for me to make you understand Because my English is poor so I hardly to write this Layer Mask but you can leave me a comment and subscribe to this comment so when I reply you will get it as my explaining is there.
Once you have done it. Take other fire image and play it in the same style of layer mask to what you think is nice to your design then you will have a result like this.
Remember to leave me a comment below for your question to me. But if you are enjoying this post and grab my full experience of this post DON'T FORGET TO SAY THANK.

19 August 2010

Creative LOGO Effect (Creatve Layer Logo) in Photoshop


In this tutorial, we’re going to create some really sharp-looking glow effects using a combination of layer styles, the Pen Tool and Color Blending. The end effect is quite stunning and hopefully you’ll pick up some tips you didn’t know before.
Let's begin with a radial gradient. This one is pretty harsh and goes from a reddish brown color to black

so what we’ll do is duplicate the layer we just made and set the one above to a blending mode of Color Dodge. There are a few types of blending modes, darkening ones, lightening ones, colorizing ones and inverting ones. Color Dodge is probably the strongest of the lightening ones. As you can see in the screenshot, it produces a pretty full-on center.

create a sort of smoky haze. To do this, create a new layer, then make sure you have white, #ffffff, and black, #000000, selected as your background and foreground colors. Then go to Filter > Render > Clouds.

set the opacity of your layer to Overlay and 30% transparency. In some instances this would be enough,
So go to Filter > Sketch > Chrome and use default settings of 4 and 7 for detail and smoothness respectively. Actually you can probably mess around with those if you want, but the defaults seem to be fine.
Once it is done then you have to make it as a layer mask. The reason to do this is to make our background in a cycle way and middle. Just  got to Layer > Layer Mask > Reveal all and set up your foreground color in black and go again to your Gradient tool (G) and set its option as foreground to transparent as below image then you will have result.

Now before we can start making glows, we need to have something to glow. Here’s where we break out the pen tool. If you have used the pen tool much I suggest playing around with it a little. There are some tricky things you can do with shortcuts, but for this tutorial you don’t need those.
In fact all we want to achieve are some nice curves. Fortunately this isn’t too hard. I find the trick is not to use too many points. Instead rely on the Pen Tool’s natural curving and drag the mouse out for each point so you get a big angle. In this S-curve shown above, I’ve only used three points, the starting point, the end point and one in between to give it the bend. So start up your Pen tool now (P) to draw latter C.

Make it as a new layer and go to your Brush option to select a brush
Then come back to Pen tool again and right click select Stroke Path and you will see a drop down menu which is ask you to select what kind of Stroke Path you like. Then we go for Brush.
After select this Stroke Path as Brush give some effect through the Layer Style as below option
Here we got it as latter C effect.
Draw another latter L and copy latter C layer style. I have not attache this image for you in the mean time if you are doubt on it please drop me a comment below there to get this image.

As you know my site is named Creatve Layer One Stop Creative Design Resource. That's why I choose latter C and L.
Well now start up you brush option go to brush tool > brush option then set it as below:
Press T to start typing text. I use CREATIVE you can use yours due to your aim. Then give its style.
Here we got it as a nice creative. I know in below image you can see some lighting dot along the C and L line and around Creative Text. Do not wonder it is what our brush set up its option just now. Once you finish your effect to the text. Then select Brush Tool and start to brush with the same affect you gave to Creative Text.
This is the last step I can say to you. Press T again and type ONE STOP to place it on the top left of Creative and DESIGN RESOURCE to place it bottom right of Creative and both text make sure you give the same as Creative Effect. Then below is your result.
I know some of you might want to say some things over here. Please drop me a comment due to your thought and share up you idea to me. Thanks have a nice day.