PART 4
Eye Dropper Tool
To use the Eyedropper tool:
1. Select the Eye Dropper tool and click the object whose attributes you want to copy. (When you click a stroke, the tool automatically changes to the Ink Bottle tool. When you click a filled area, the tool automatically changes to the Paint Bucket tool)
2. Click the object that you want to apply the new attributes to.
Using the Eyedropper tool to select a bitmap fill:
Rather than painting with a fixed color or gradient you can paint using a bitmap image. A very important special use of the eyedropper tool is to select bitmap fills.
1. Place a bitmap image on the stage. Either drag it from your symbol library (Ctrl+L or Window > Library) or import a bitmap image from a file (Ctrl+R or File > Import).
2. Make sure the imported bitmap is selected. (If not: click on it with the Arrow tool).
3. Press Ctrl+B to break apart the image.
4. Select the Eye Dropper tool and click on the image.
You will now see a miniature of your image in the Color Fill tool box. Use the Paint Bucket tool to apply the bitmap fill to an object. (Note: you can apply the fill to any filled object as well as any closed outlined area.)
Pen Tool:
The purpose of the Pen tool is to allow you to draw precise paths as straight lines or smooth, flowing curves.
You can create straight or curved line segments and adjust the angle and length of straight segments and the slope of curved segments afterwards.
There are two methods for drawing with the Pen tool:
1. Click to create points on straight line segments
2. Click and drag to create points on curved line segments.
Each method is described below.
To draw straight lines with the Pen tool:
1. Select the Pen tool.
2. Click on the stage to set points, and watch how Flash automatically connects points as you set them.
3. To complete the path leaving it as either an open or closed shape. Do one of the following:
3a. To complete an open path, double click the last point or click the Pen tool in the toolbox, or Control-click (Windows) or Command-click (Macintosh) anywhere away from the path.
3b. To close a path, position the Pen tool over the first anchor point. A small circle appears next to the pen tip when it is positioned correctly. Click to close the path, and watch how Flash automatic adds a fill once the path becomes a closed outline.
To draw curves with the Pen tool:
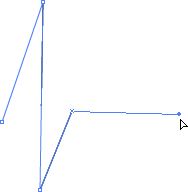
First look at this 4 step example:
An example of curve drawing with the pen tool
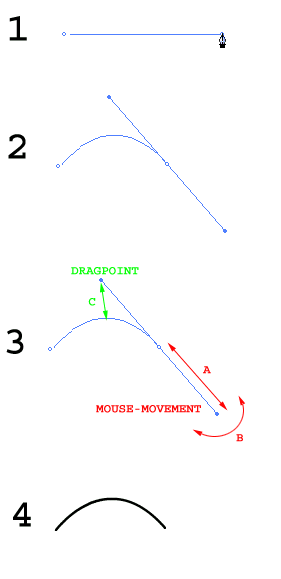
1. Select the pen tool and click twice to create a straight line - on the second click keep the mouse button down.
2. Drag the mouse towards yourself - which will cause the control line to appear. The control line is pulled in the one end and has a drag point in the other end.
3. Move the mouse from side to side (B) and forward and down (A)- still holding down the button, and see how the drag point moves accordingly.
The drag point defines both how much and in which direction the initial straight line is dragged.
4. When the curve on the initial straight line is shaped the way you want it release the mouse button, and the end result appears while the control line disappears.
he only object type in Flash, that can detect mouse events is the Button object.
This means that there is only one way to make buttons with Flash: Creating a button object.
This may sound a bit too simplified, but many are confused by the techniques behind the more sophisticated buttons, that we will cover later in this tutorial.
Creating a button that changes upon mouseover-events is extremely simple. All you really have to do is to tell Flash how you want the button to look 1) in normal state, 2) when the mouse moves over the button and 3) when the user clicks the button.
Once you've learned this 3-step technique you can create buttons in seconds.
However, the buttons you create this way are: simple (that's why they're so easy to make anyway).
If you want to create really fancy buttons you should use a slightly different technique based on movie clips.
The Three Different Object Types
Flash handles three types of objects:- Graphics
- Buttons
- Movieclips
You probably already noticed that when you edit Graphics objects you have the entire timeline available for it. This means that Graphics objects aren't limited to static elements. You can easily create looping animations - simply by creating Graphic objects that uses more than one frame in the timeline.
Button objects
Buttons are different from this. When you create a Button object you only have four frames in the timeline.
One is for drawing the button in normal state.
Another is for drawing the button when a mouse-over is detected.
The third is for drawing the button as you want it to look when the user clicks the button.
The last frame is used to specify which area you want mouse events to react to. That is: you can create a button that only reacts to mouse-events on certain areas of the drawing, - like the center of the button for example.
Movie clip objects
The final object-type: Movieclips, is similar to Graphics objects - on the surface.
In both cases you can create entire animations that can be dragged onto your main movie. But while animations made as Graphics objects simply loops over and over you can control the Movieclips completely.
THE TRICK BEHIND FANCY FLASH BUTTONS
You can create more fancy buttons based on very simple programming. (You do not have to be a programmer to learn to do this!).
Actions added to frames give complete access to controlling movie-clips. This means that you can use "Play", "Stop", and "Goto Frame" commands on a movie-clip, that is triggered when a certain mouse event is detected on a button.
Now - if the button is invisible and placed on top of the movie clip it will work as if the movie-clip itself was able to detect mouse events.
Simple Buttons
The easiest way to create buttons with Flash is creating a Button object.Creating a Button
To create a Button object, do this:1: Choose Insert->New Symbol in the menu (Or press Ctrl-F8)
and the Symbol Properties Box appears.
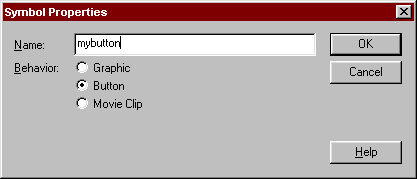
Add a name for your button and make sure the Button option is selected.
2: Click OK and the button editor opens.
As you see it looks exactly the same as the standard Flash editor, with one exception:
You only have four frames in the timeline.
3: Draw a button the way you want it to be when no mouse event is detected.
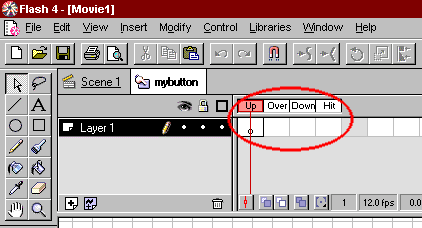
Notice that the active frame is labeled "Up" in the timeline.
4: Insert a keyframe in the frame labeled "Over" in the timeline.
(To do this: Click on Layer 1 in the white cell below where it says "Over". Then press F6.)
5: Draw a button the way you want it to be when a mouseover event is detected.
6: Insert a keyframe in the frame labeled "Down" in the timeline.
(To do this: Click on Layer 1 in the white cell below where it says "Down". Then press F6.)
7: Draw a button the way you want it to be when a mouse-click event is detected.
That's it - you've created a button with three looks that will change upon mouse events.
You still need to specify which area should be clickable as well as what should happen when the button is clicked. Proceed to learn about these steps.
The above, credit should goes to Techi Warehouse we recommend you to find out more over tutorial from there
Oh my goodness! Incredible article dude! Thank you, However I am
ReplyDeleteexperiencing difficulties with your RSS. I don't know why I am unable to join it. Is there anybody getting the same RSS problems? Anybody who knows the solution will you kindly respond? Thanks!!
Also visit my site ; SEO Zürich