About Graphic Design provides tutorials and tips on graphic design techniques, career advice, and information on the legal side of design, color, fonts, typography, history, education, software and computers.
04 August 2010
Photoshop: Eraser Tool & Clone Stamp Tool to manipulate smoke designing
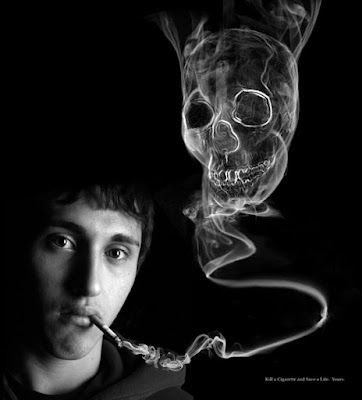
Learn to apply the Warp Tool effectively and a few other tricks to make smoke look like a skull. This technique has a variety of outcomes and works well with water, clouds and a whole bunch of other stuff. This is probably more for intermediate users, as I guide you through the process well, but not every Warp Grid point handle move. Before we go on you might have below image ready.
1- Smoker
2- Skull
3- Smoke A
4- Smoke B
Let’s get started!
Open up Smoker image. It should look like this.
Just create new document with size 544 px (W) x 600 px (H) resolution 300 px background in black. Cut the top smoke and keep it on side.
Open the Skull image and draw a path around it using the Pen Tool (set to Paths not Shape Layers). Roughly clone out unwanted elements such as the nuts and bolts using the Clone Stamp Tool (with a soft edged brush).
Next we’re going to treat the skull. Adjust the Levels (Image > Adjustments > Levels) as shown. Then select the Clone Stamp Tool (with a soft edged brush) and clone out the area of shadow in the eye-socket to the right-hand side.
Don’t worry about being too accurate, it should take you a minute. Then desaturate the Skull (Image > Adjustments > Desaturate) and apply a Glowing Edges filter (Filter > Stylize > Glowing Edges) as shown.
Remember the first starting we cut and keep the top smoke on a side. Now use it back and re-adjust by Ctrl + T and right click select warp and make it as seen below
Open the Smoke A image, Invert the image (Image > Adjustments > Invert) so the smoke is white and the background is black. Then copy and paste it into the working document, and name the layer “SMOKE.”
Change the layer blending mode to Screen. Finally copy the Layer (Layer > Duplicate layer).
And now it is time to start using your Eraser Tool. Just transform your smoke and right click and to select warp. Again just use your eraser tool to design on the smoke. Follow step by step of the below image.
Now the skull is ready for some lighter, wispier areas of smoke, which should add realism to it. Download the Smoke B image and open it up. Change the layer blending mode to Screen.
Keep copy one be one of this smoke work with eraser tool adjust it on the below option till you finish your work.
Step by step as below:
Once you have done it here is your result.
I you might know how effective of this smoke. So KILL A CIGARETTE AND SAVE A LIFE. Have you say somethings over here yet. Drop me a comment if you have doubt. Thanks
Subscribe to:
Comments (Atom)


