In this tutorial you will learn how to make an effect by using Filter Tools and Layer Style the only special Tool is Brush Tool which I used to inform in my previouse tutorials. In this tutorial as well some of the tchniques I used I took from other tutorial so I recaped it and make you easy to understand which I recommand you to read this tutorial one by one step.
Step 1: make a black background size 10cm x 10cm res: 72.

Step 2: make brush preset. Press short cut (M) to draw a a line and create a new layer fill in gray color. Go to Edit menu choose Define Brush Preset... do like this is to make a brush by your own style. Name your new brush and go for setting. See image below

Step 3: Brush setting. In Brush Preset choose your brush and go to Sharpe Dynamics adjust the size to 50%. Ticket the Scattering choose scatter 365% and go to Color Dynamics set all in 50%

After that create a new layer and start brush it as seen.

Once you are ready then go to Filter menu => Blur => Motion Blur in the option box set as 90 for Angle and 155pixels for Distance.

here we have after motion blur.

Step 4: use this image to make the earth effect. you also can download it here (http://ieslaroda-bilingue.wikispaces.com/file/view/blue-planet-earth.jpg/98707105/blue-planet-earth.jpg). Then tag it to our work and rotate as seen.

use Elliptical Marquee Tool draw a rounded and move to buttom of our work document. Then inverse this selection and delete the rest of earth.


and now reload selection this earth layer by go to edit menu => load selection. Hide the earth layer and delate the brush layer in our selection area. Press Ctrl + D to unselect and use the Eraser Tool to erase part of prush layer.

Remember after select the Eraser Tool in the properties box above there choose a small blur one and reduce the opacity to 50% and start erase the brush.

Step 5: applying Gradient Overlay to this brush. Use normal Blend Mode but your Gradient must be in multi color. I choose Red, Yellow, Blue and Black.


Step 6: unhide your world layer and apply layer style. Now firstly apply Inner Glow in the Blend Mode go to Hard Mix and opacity 75% in red color then size is fully 250 px.

Agian in the same box apply Outer Glow. Blend mode Color Dodge. Opacity is 75% size only 87 px.

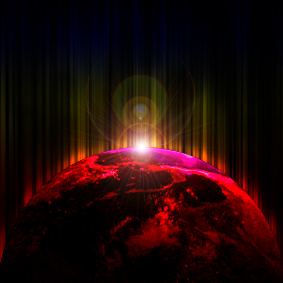
Here result.

Step 7: this should be last step to complete this tutorial. Create a new layer as seen below fill in black and go to Filter menu => Render => lens Flare. In this Lense option box adjust the brightness to 100 and choose the lens type 50-30mm Zoom. In the Layer Blend Mode make it as Screen. Finally go to Image menu => Adjustment => Lavel and adust as Channel => RGB Inputs Levels => 25 1.00 255.

Finall Result: there are lots of ways to create this effect, and lots of good tutorials showing how to create that type of brush tools, Filter or layer style. But this tutorial is another new way to make a new style and I hope you enjoy it.
Great design
ReplyDeleteListen to Big Jams Music online today www.mp3.cambotube.net
I really like this cool earth effect. Now i will create one for my blog post.
ReplyDeleteWhat an exceptional earth effect you have made with . So much thanks for shared .
ReplyDelete