27 March 2010

Make a poster Ads with Illustrator

See the top poster how interest of it. Yes it is vey simple and easy if you are more undestanding on how to do it. Well from now I will show you step by step to do it and sure with my 100% details you will can do it.
Ready now!! Ok start up with your Illustrator and create a new document with size 10 cm by 10 cm.
Then draw a square using Rectangle Tool or press M and add a black color.
do the same but make it smaller and add white color
Make other small layer in this white. Select both layer big white and small white. And press Ctrl + Shift + F9 to show a parth finder. We are trying to make this two layer become one layer. After you had select this two go to the pathfinder select exclude overlapping Shape areas. See image below
Here layer after joined together.
Give a Gradient on it. Follow by the image.
See how it looks
Using the same method make it anothe small layer with the same Gradient. See it
Now seems to be finished. Yet you have to make new square
Use brush tool to have some cave.
Then draw it straight on the top of layer. Make it in all square face.
See it how it looks. Then using the pathfinder dialog.
draw a square with same size of the bottom black layer (first layer). Redraw a white square as seen in below image and merge together. Once you done it. Move it on the top of brush curve.
Ha the same again. Select select both layer and right click choose make clipping mask. Right away give it 50% opacity.
Rectangle Tool again ha ha. Draw a vertical inside this poster and give a Gradient as seen.
Make it in to 2 by hold Alt and draw it.
Duplicate this vertical style by press Clrt + D. Here we got
Wow just add some text to your promotional text.
Hey hey two more step to finish. Press Pen tool (P) and draw a ribbon and Gradient.
final drawing a black shadow behind this ribbon. Text a dead line of this promotion.
Enjoy this post feed back with your simple comment and share. Thanks

18 March 2010

How to create Adobe Illustrator Logo In Adobe Illustrator

So far when I was start on how to use pen tool. I was very hard to make a logo. After a short while I got understand. I hope this tutorial will help some people who like me will enjoy it.

Let's go, use your pen tool now (P) draw a leave like this

Then add gradient style follow this image
Duplicate this leave into 3 pcs by using your way to do (Ctrl+D). But make sure you use the Rotate tool (R). It can help you to make your leave cycle.
Now you got it. Use your pen tool again to draw another leave. See image
By using the same gradient style but now you have to make it multiply on the Transparency tag to be seen the below layer.
Do again duplicate into 3. 

Now the flower has create but yet to finish. Pen tool again (P) draw a small path in middle of the leave.

Color this path and make in middle of every leave. See it below
Use Ellipse tool (L) to draw a cycle in middle of all path and gradient it. Then go to the effect menu on the top add a layer style of outer glow. You can see the sequent of number this below image and try to follow. If you are not sure with this one please email me at chetsary@gmail.com
Ok it is about to finish just make a bit style. Group that flower together and make a copy. Reduce smaller a bit move to the right corner of the document.
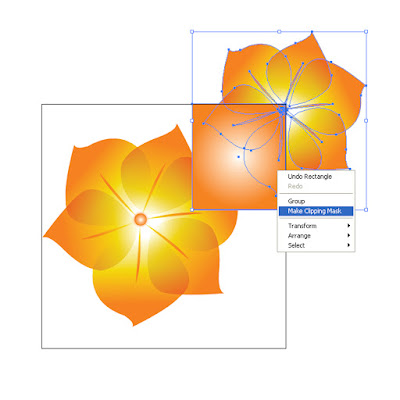
Use Ractangle tool (M) and draw a square over that just a corner only. Select both (small flower and a square) then right click. Make clipping mask to take a piece of flower and opacity it lower like blur. And you will have that square piece.
make copy of that square piece and make it smaller like this.
Again press M to use rectangle tool and draw a small square using red color. We are now trying to draw Adobe logo.
press P to draw A sign. 
After you did it. Give a with color without stroke. And add a text below as Adobe. Here you got the result.
Enjoy this post, please kindly give a simple feed back throught a comment box. I am please to get don't worry. But do not copy this tutorial or others from this blog. It is my own idea if you do it make sure put a link back incase you will face a prohibition of copy right.

Hey please do share it to your friends with my facebook icon and twitter or else.

Stay back I will have more to post. Thanks for visiting.

02 March 2010

Easy way to make a button design with Adobe Illustrator


To make a button now in Illustrator now just only 3 layer to do. Very easy but it is my style to do it. I think some body will have a better idea then me. Since you are on this page please try it up. Create new first, as what I did mention I like to size it  in Centimeter (CM) because my country is mostly used. see image
 
Start on first layer 
By press L to take the Ellipse Tool to draw a cycle. Make sure you have put in a stroke with side as you need. But in this I put 1 black stroke.

Add Gradient with black and silver.
Finish for the first layer
Let's go on to second layer by using a short cut on the keyboard. I think it can make your work faster. Press Ctrl + C to copy that first layer and Ctrl + F to make a new copy (second layer) stay on the top of the first layer. Make it small then the first one.
 
Then change the Gradient
Alright second layer also finish.
The final layer. Agian use Ellipse Tool (L) to draw and suddently give a Gradient.
 
here is the result.

 
Then you can add in some sign to make a nice button by using symbols. See below image
 
I hope you will enjoy this and kindly leave a simple comment to support my job. Share it if you like and you are free to copy it to your website or blog but link back to me is a must. Thanks