Showing posts with label Brush Tools. Pen Tools. Show all posts

23 May 2011

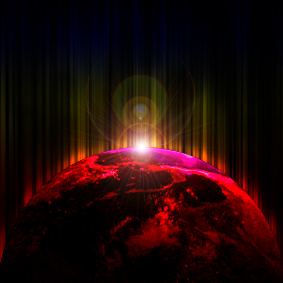
Photoshop Tutorial: Cool earth effect

In this tutorial you will learn how to make an effect by using Filter Tools and Layer Style the only special Tool is Brush Tool which I used to inform in my previouse tutorials. In this tutorial as well some of the tchniques I used I took from other tutorial so I recaped it and make you easy to understand which I recommand you to read this tutorial one by one step.

Step 1: make a black background size 10cm x 10cm res: 72.

Step 2: make brush preset. Press short cut (M) to draw a a line and create a new layer fill in gray color. Go to Edit menu choose Define Brush Preset... do like this is to make a brush by your own style. Name your new brush and go for setting. See image below

Step 3: Brush setting. In Brush Preset choose your brush and go to Sharpe Dynamics adjust the size to 50%.  Ticket the Scattering choose scatter 365% and go to Color Dynamics set all in 50%


After that create a new layer and start brush it as seen.

Once you are ready then go to Filter menu => Blur => Motion Blur in the option box set as 90 for Angle and 155pixels for Distance.
here we have after motion blur.
Step 4: use this image to make the earth effect. you also can download it here (http://ieslaroda-bilingue.wikispaces.com/file/view/blue-planet-earth.jpg/98707105/blue-planet-earth.jpg). Then tag it to our work and rotate as seen.
use Elliptical Marquee Tool draw a rounded and move to buttom of our work document. Then inverse this selection and delete the rest of earth.
and now reload selection this earth layer by go to edit menu => load selection. Hide the earth layer and delate the brush layer in our selection area. Press Ctrl + D to unselect and use the Eraser Tool to erase part of prush layer.
Remember after select the Eraser Tool in the properties box above there choose a small blur one and reduce the opacity to 50% and start erase the brush.
Step 5: applying Gradient Overlay to this brush. Use normal Blend Mode but your Gradient must be in multi color. I choose Red, Yellow, Blue and Black.
Step 6: unhide your world layer and apply layer style. Now firstly apply Inner Glow in the Blend Mode go to Hard Mix and opacity 75% in red color then size is fully 250 px.
Agian in the same box apply Outer Glow. Blend mode Color Dodge. Opacity is 75% size only 87 px.
Here result.
Step 7: this should be last step to complete this tutorial. Create a new layer as seen below fill in black and go to Filter menu => Render => lens Flare. In this Lense option box adjust the brightness to 100 and choose the lens type 50-30mm Zoom. In the Layer Blend Mode make it as Screen. Finally go to Image menu => Adjustment => Lavel and adust as Channel => RGB Inputs Levels => 25 1.00 255.
Finall Result: there are lots of ways to create this effect, and lots of good tutorials showing how to create that type of brush tools, Filter or layer style. But this tutorial is another new way to make a new style and I hope you enjoy it.

03 March 2011

Photoshop tutorial: Magic glow

How to create vector magic hat in Photoshop was my favorite design. If you like to learn and want to know how kindly visit above link. With both tutorials you might know how to use Brush Tool in Photoshop. In this tutorial you will learn how to set Brush Tool in effect. 

Let make a new document size: 10 x 10 cm and apply Gradient as seen below:

and get a magic glass to your work.
We make a shadow below this glass and also make this glass might lightness.
1- make glass more lightness ==> image adjustment ==>Curves (Ctrl + M) apply lightness as below.
2- We make a shadow below this glass. Use Elliptical Marquee Tool (M) draw it and apply black color and go to Filter => Blur ==> Gaussian Blur then set Radius: 4.0 pixels
Use Elliptical Marquee again to draw to of glass apply white color and make it a bit blur (to make it blur just follow above instruction) and apply Outer Glow with below option:
  • Filter ==> Layer Style ==> Outer Glow
  • Blend Mode: Color Dodge
  • Opacity: 75%
  • Size: 114%
make a new layer and set up Brush Tool in below step by step option:
Using your foreground color in white to brush here and there then apply Outer Glow again. See option below
Finally use Lasso Tool to draw a layer (L) in white color then apply Gaussian Blur with Radius: 90.8%
Then here your result.
How do you enjoy this post. Let's share it to your friend and leave me a comment below: Wish you all the best.

06 December 2010

Create a Christmas Tree in Adobe Photoshop

This year going to end by this December. That's the reson I decide to share you this tutorial. To create this Christmast Tree I mainly using Brush Tool, Pen Tool and Custom Sharp Tool. Base on this it might be not creative enough shall I need your idea to improve my creative as well so after you read through and try yourself please show me what is your thought.
Let start with:
Step 1: Open your Photoshop and make a new document size 10cm x 10cm resolution 72 pixels. Make a new background color with Gradient style as seen below
Step 2: Using Pen Tool (U) and start drawing a Christmas Tree and color it with back.
Step 3: Using Brush Tool to brush the start which is related to Christmas Theme and adjust with below option.

Step 4: Make sure you have create new layer (Ctrl+Shift+N) and your foreground is white before you start to brush.
 You can adjust size of the stars and hide the black tree and press U to add a big star above the tree in white as well. Here it is.

Step 5: Using Custom Sharp Tool (U). Look for cycle like below object and draw it in white color where your white star is.

Step 6: I know some of you are regularly ready all my post. I always mention on how to make a layer mask like How to make a fire effect and How to create an effective logo and more about Photoshop style but yet if this is your first time I would warmly welcome.

Well to start this layer mask please look to your layer pallet the below there are shortcut and see below image you will understand
Once you press it mean you are on the way to make a mask on a layer so make sure you are on what layer you want to make a mask. Adjust you foreground and background in black and white. Press G (Gradient) and see the Gradient option just follow as what I did
Then  go to your tree and start mask it as you seen in below image to your result.

 Step 7: Using Pen Tool (P) to draw a tree again. Do like this you star will become real tree.
Step 8: Look back to use the Custom Sharp Tool (U) and look for a Christmas snow path.
 Give white color to the snow and only 40% opacity. And here your last result.
Hope you feel good with it and enjoy your design. Change background or style as you will or drop me a comment if you have doubt.

30 August 2010

Awesome fire effect for 3D text (Photoshop)

This tutorial is going to be a little more advanced than the other ones I have done. It shouldn’t be a problem if you have been following along with our other tutorials or have a grasp of Photoshop. As my previous post I also shown on How to Create a Stunning Fire Effect In Photoshop . So lets begin.
Open up your Adobe Photoshop and make a new document (Ctrl + N) size: 10cm x 10 cm resolution : 72pixel and black background color.

Press T to start typing text. Type F in the meaning of FIRE. Just look to the right of your work space you will see a new layer of this latter F then right click on it => Rasterize Layer. Do like this your text will become an object and do remember that once you Rasterize it can not be re-edit as text.

Transform this F and right click again => Distort then try to make this F as seen in below image.

Then download this image. We will use it from now as a background and fire effect and name it as BACKGROUND IMAGE.
After download finish bring it into your work place and make a copy by select this image all and Ctrl + C.
Load latter F selection now press Ctrl + Shift + V to pass the image as a layer mask.
Here we got
Press Pen Tool to start draw 3D.
Draw this 3D until you finish. Then it should be look like this
Merge all layer together (select all layer and Ctrl +E). Look to your layer and adjust the color to Linear Light
Then you 3D latter F will look like below
Use the background image this time and put a layer mask and Ctrl + U to adjust color into it as seen. If you're all are misunderstanding this part please leave me below comment or contact me for my fatest reply.
Alright now what to do?
Use your Pen Tool again but this time we are making shadow of latter F. To make it easy way just copy this merge latter F and give a black color on it then => Filter => Blur => Guassian Blur
Do the same to all latter as we F now continuous to I, R, E and place those latter some thing nicely.
It is time to make some fire effect and it should be the last step. Download these fire and bring all to your work place.


Let take one of it and make layer mask to cut all black background. It is hard for me to make you understand Because my English is poor so I hardly to write this Layer Mask but you can leave me a comment and subscribe to this comment so when I reply you will get it as my explaining is there.
Once you have done it. Take other fire image and play it in the same style of layer mask to what you think is nice to your design then you will have a result like this.
Remember to leave me a comment below for your question to me. But if you are enjoying this post and grab my full experience of this post DON'T FORGET TO SAY THANK.