23 February 2010

How to Create an arrow sign light animation in Adobe Photoshope

As my previous post like an animation also but it is on how to make a wording replacing like jumping   and now I am going to show you on how to create a new animation arrow sign light. Now with this size W: 1772 pixels and H: 591 pixels with resolution 100 pixels.But before this you can diplay an animation box by go to windows ==> animation.

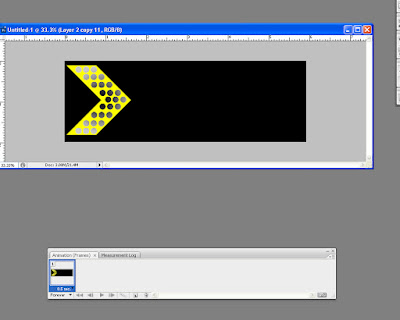
press U to use your custom sharp tool. Select the arrow sign and start make a arrow part and Clrt+Shift+Enter to make part into selection then Ctrl+Shift+N make a new layer and give a yellow color.
 
Press U again and use Ellipse Tool to draw a cycle. Do it the same as arrow part instruction. After you have make it as a new layer, give some color style but putting Gradient. Go to Layer =>Layer Style=>Gradient Overlay.


try to do it like below image.


Once you have finish these. Link all cycle just now together. Then make a copy of that link. Take one of the image of the copy link to give a Gradient.


Then copy that layer style (Gradient style) to all the link layer. Merge this new layer and put it on top of all layer. So the result gonna be like this


Hide it. I know you know where to hide. If not just look back to the layer panel see where and what layer you are on. Then select the eye sign. Once you hide it that layer also hide. At the same time hide the yellow arrow sign as well or you can delete it if you want.
Now refer back to the first link we drawn a cycle. Merge it again and Ctrl + J on it to make new layer. Do it 5 times and arrange it as image below.
 
duplicate your animation folder into 6 too this time we are making animation.


Look back to the last Gradient we did. Ok now select number 2 on the animation frames and unhite it. But you have to know that one animation frames is one arrow sign. Mean 6 animation frames so your arrow sign also 6. see the above image. Then when you are on 2nd animation frames you have to make the Gradient light on 2nd arrow too. see below
Do the same to the animation frome number 3. Select the animation frame 3 and duplicate the yellow light sign by press Ctrl + J and take it above arrow sign 3.

Just a small note: when you do an animation on layer 3 you have to hide the animation on layer 2. If you do on layer 4 you have to hide layer 3. I hope it is easy understand for you because my English is poor. 
Do it all the same to all layer up to layer 6. Final you have to adjust time for animation running. Right click on animation frames start from 1st to 6th and select 0.5 sec for all. then play it. after all are ok then save it as GIF or press on you key board Ctrl + Alt + Shift + S and see the looping option select forever.
Here the final result.
if you are more understand try to make like this


any question please feel free to leave your ask on the comment box. I will try to solve it by my best and my poor acknowledgement. To get the original file please click here. Thanks

19 February 2010

How to create vector magic hat in Photoshop


I don't know much a bout it in Illustrator. Most of people who can design sure they will draw this in Illustrator. But I hope this tutorial could bring you new thing with Photoshop. No need to talk much about this. let start now.

Create a new document size: 1179 pixels x 1179 pixels and solution 300 pixels. As what I have told before I like to use big solution because it can help to make my image more clear.

After a new layer has created give a Gradient Style like below.


use your pen tool to draw a hat or if you like your own hat please do it. It can save your time too. After you draw create new layer then fill color what ever you like and give some style like Bevel and Emboss 
* style: Inner Bevel
* Technique: smooth
* Dept: 71%
* Size: 6%
* Soften: 6%


And add Gradient like image. I hope you can read the image.


Then here it is 
Press U select Elepse Tool to draw a cycle and give some style like the old one just now I did. 

It should look like this after I had edit my style. I copied old layer style to this one. If you like you can do that by right click on that layer select copy layer style and past the layer you want. That's it.

Then copy that cycle layer by press Clt + J to make a new layer and transform it smaller put it on the top and edit the Gradient style. See image.
Now we got a black hat. Again use your pen tool to draw a small bat and copy your layer style.
 
And draw the 3 red cycle note. I think it won't hard to do that. I know you can because you know well about Photoshop.

 
Type text as vector magic and make it as a phrase then vertical . Go to filter choose distort and shear

 
hear the result after shear.

 
Duplicate this shear layer in to 2 and reflex it then give some outer glow.
* Blend mode: color dodge
* Opacity: 83%
* Technique: softer
* Size: 24
 
merge that together and duplicate again but this time give it a black color no outer glow and opacity only 30% make it small or bigger a bit to become a shadow.
new thing, draw some thing which is along the vector magic way and give some style.
Out glow
* Bleng mode: screen
* Opecity: 100%
* Color: white
* Technique: softer
* Size: 84

Color Overlay
* Blend mode: normal color is the same or similar to the vector magic phrass
* Opecity: 39

Then you will have you drawing like this image.
Move it into vector way. Then the color will appear. 
 Make some light by giving the same layer style at around that light as seen in image. 
 
Copy and pass it around inside the hat. then your shine light will give a cool effect. 
How do you feel now. It is almost finish. Add some brush light on it. Press B and go to brush setting. Set as the same or what you like. 
Start brush now and you will have.
 
 The final just make a black shadow on below all the layer. Here we got the result.

 
Don't forget to share it to your friend but please do not copy. Prohibited is your dicision. I like to recieve commnet worth or good are welcome. Please do it. Greeting from Cambodia. Sary

18 February 2010

Create a poster with Adobe Photoshop


Create new document with size W: 1181 pixels H:1181 pixels and resolution is up to you as long that your computer goes fast for your design. for me I put 300 pixels.
when you got a new document then straight away give a black color background on it. Using this image to make it happen for your deign.


if you like your image you also can do that. Now start write some wording on the black background and do the same like me. 


I understand that my image is hardly to see but to make you more understanding you have to type your own word as a phrase and make it full of your black background in different color like what you have seen. Make sure all wording is merged together become one layer. Then start take the image above all layer. 


using your pen tool to draw mouth and copy that mouth into new layer by press Clt+J


Then move the image down below all layer.
Final just type text and make it like image.
 
Don't forget to leave a comment because I like to receive comment it can make me more hopeful to make up my mine for a new thinking. Evey one can suggest me over there. Then start sharing through facebook and twitter. Thanks

17 February 2010

How to create 3D Puzzle in Photoshop


This time I don't write alot because I am not an English speaking. Well forgot to let you know where I am from. Cambodia is my country. Peace and hopefull. My name Sary. I am trying to write this tutorial to you but not to say I know well cos I also learned from other friends and website. I think it is time to start I will try to use more image for you to understand.

Let's start with a new document in black background size up to you but I use 10 cm x 10 cm. Then press U on your keyboard. IT will take you to get a path as you seen on image. You can draw your own if you can or use other path as you like. This is a simple and sample way for you but for me I draw it my own. It is easy.


I draw it like this and color it in red. I also add in some layer style in it like Bevel and Emboss and Gradient Overlay. You will notice one my path there is light red and dark red. Yes it is my Gradient Overlay.


Finished this one just thinking on how to make it square. Well I dupblicated this into 4 different layers and color as seen now. 


I am still remind you if you want to play with your color you can do it from there because when you go to next step it might make more effected to your design. As what I said this step you have to merge all this layer together. By select all layer and press Clt + E or you can go to the layer menu and select merge layers. Now here we got after merge. 

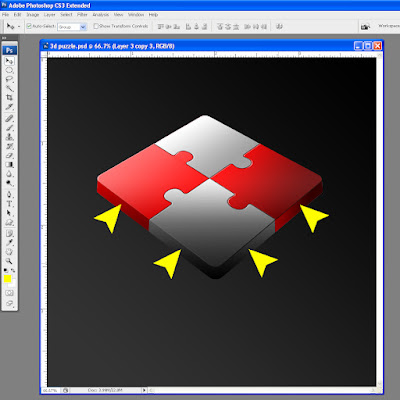
Next transform the merge layer or Clt + T and right click on that transform select skew make the image as what you see on the image. 

  
But before this you have to use your pen tool (Press P) to draw a 3D style I think it is not defficult for you. Ask me if you are doubt at chetsary@gmail.com or connect to my facebook and write on my wall because I do check it every day. See it here


Ok now you got it and it is almost finish us a few step more. Now you have finish the 3D drawing and give it Gradient Overlay with Bevel and Emboss on it a bit. It should look like what you have seen. Then merge all togher again. Totally since you start we have only one layer which is already merge. Dublicate again that layer and scrool it down abit to make as a reflection. 


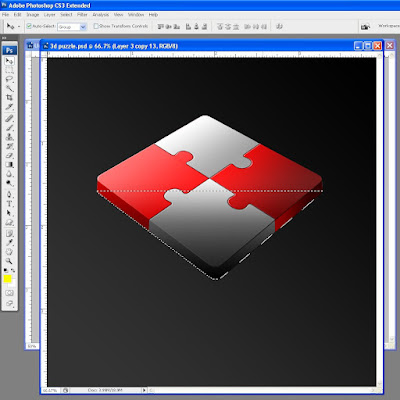
And make it a shadow in the middle. Do it like I am it will me you easy to uderstand. Just load your layer selection and cut the selection like this. 


and Clt + Shift + N to make a new layer. Then give a black color on it make it blur abit you will have.


Move it down in the middle of the layer and type 3D Puzzle below that layer then you will have the result. 


Enjoy the post please kindly feedback through your comment and please do your kindness to share. Thanks Sary from Cambodia.