Base on the above image you will feel some think. Well don't think it is hard to do but it is exacltly easy to do it. Let's follow me and try out your design from step to step as below:
Step 1: create new document and Gradient as below image option
Step 2: get your pen tool ready (press P) and drawing this snowflake as seen here.
Step 3: now use this snowflake just transform in a line and cycle it below as a Christmas thing. Remember to make it different size like big here small there....
Step 4: after this copy this snowflake into 3 different object.
and do like below image as well. Only make it in different places. Big here small there.
Step 5: Use Ellipse tool to draw cycle object and apply Gradient style & Transparency as below
Do copy and follow below image.
This one also. I hope it is easy to understand for as I don't have to explain much of it but if you still have question please drop me a comment below.
Step 6: Once every cycle object is done. Now again drawing another cycle but do not fill in any color but yet a stroke color in brown and 1pt. See below option.
Then do copy again and again.
Step 7: now making a shining for the snowflake. Use Ellipse Tool and drawing apply for Gradient. Then on the Transparency tab we make a layer make style. Adjust here ==> Screen style and opacity: 100% then go to Gradient again adjust the type of Radial coloring in white and red. See below
You did it all and copy to some where else of the snowflake to make your snowflake more shiner then finally you got the result as below.
Thanks for joining us I understand that my design to you is not enought yet. I would like to ask if you have any things wanna say please do it in my comment box below: All your comment will keep me update and also improve my Creative. Merry Christmas to all and a Happy New Year.
About Graphic Design provides tutorials and tips on graphic design techniques, career advice, and information on the legal side of design, color, fonts, typography, history, education, software and computers.
23 December 2010
20 December 2010
Abstract new year 2011 colorful design in illustration
Christmas is coming on your way with a greatness happiness, healthy, gold and monies. This design is another knowledge which I learned from other vector graphic. To start this you have to understand and imagine how the design goes. Let's start create a new document gaven a black background.
Type 2011 by choosing a nice font or what ever which you think it is the best.
Outline this font by just right click on it and select create outline
Then we have to offset path just make sure you are on the outline object and go to Object menu ==> Path ==> Offset Path...
The Offset Path dialogue is appeared then adjust it as Offset: 0.04cm, Joins: Miter and Miter limit: 4 then press OK.
After this you have 2 2010 object. Select the 2nd object and Gradient as below image.
Press the 1st object and give another Gradient style as seen.
Finally the New Year 2011 is starting to appear.
Press L to draw cycle object and again Gradient it as: Type: Radial color with a pink and adjust it as seen. After all the transparency as Scree.
Backward that object and make another color with the same adjusted. By following below image you will know how to do.
Press L again and redraw a small cycle object in white color. Duplicate in full of black background and group it. Then go to the Transparency tab choose overlay. and backward.
The last step is make a shadow of 2011 and add some lighten start on it the below is the result.
Have you say thanks yet if you enjoy this tutorial. I know some might a bit difficult but give yourself a try. I know every one can be better then this tutorials. Please share us.
06 December 2010
Create a Christmas Tree in Adobe Photoshop
This year going to end by this December. That's the reson I decide to share you this tutorial. To create this Christmast Tree I mainly using Brush Tool, Pen Tool and Custom Sharp Tool. Base on this it might be not creative enough shall I need your idea to improve my creative as well so after you read through and try yourself please show me what is your thought.
Let start with:
Step 1: Open your Photoshop and make a new document size 10cm x 10cm resolution 72 pixels. Make a new background color with Gradient style as seen below
Step 2: Using Pen Tool (U) and start drawing a Christmas Tree and color it with back.
Step 3: Using Brush Tool to brush the start which is related to Christmas Theme and adjust with below option.
Step 4: Make sure you have create new layer (Ctrl+Shift+N) and your foreground is white before you start to brush.
You can adjust size of the stars and hide the black tree and press U to add a big star above the tree in white as well. Here it is.
Step 5: Using Custom Sharp Tool (U). Look for cycle like below object and draw it in white color where your white star is.
Step 6: I know some of you are regularly ready all my post. I always mention on how to make a layer mask like How to make a fire effect and How to create an effective logo and more about Photoshop style but yet if this is your first time I would warmly welcome.
Well to start this layer mask please look to your layer pallet the below there are shortcut and see below image you will understand
Once you press it mean you are on the way to make a mask on a layer so make sure you are on what layer you want to make a mask. Adjust you foreground and background in black and white. Press G (Gradient) and see the Gradient option just follow as what I did
Step 7: Using Pen Tool (P) to draw a tree again. Do like this you star will become real tree.
Step 8: Look back to use the Custom Sharp Tool (U) and look for a Christmas snow path.
Give white color to the snow and only 40% opacity. And here your last result.
Hope you feel good with it and enjoy your design. Change background or style as you will or drop me a comment if you have doubt.
Let start with:
Step 1: Open your Photoshop and make a new document size 10cm x 10cm resolution 72 pixels. Make a new background color with Gradient style as seen below
Step 2: Using Pen Tool (U) and start drawing a Christmas Tree and color it with back.
Step 3: Using Brush Tool to brush the start which is related to Christmas Theme and adjust with below option.
Step 4: Make sure you have create new layer (Ctrl+Shift+N) and your foreground is white before you start to brush.
You can adjust size of the stars and hide the black tree and press U to add a big star above the tree in white as well. Here it is.
Step 5: Using Custom Sharp Tool (U). Look for cycle like below object and draw it in white color where your white star is.
Step 6: I know some of you are regularly ready all my post. I always mention on how to make a layer mask like How to make a fire effect and How to create an effective logo and more about Photoshop style but yet if this is your first time I would warmly welcome.
Well to start this layer mask please look to your layer pallet the below there are shortcut and see below image you will understand
Once you press it mean you are on the way to make a mask on a layer so make sure you are on what layer you want to make a mask. Adjust you foreground and background in black and white. Press G (Gradient) and see the Gradient option just follow as what I did
Then go to your tree and start mask it as you seen in below image to your result.
Step 7: Using Pen Tool (P) to draw a tree again. Do like this you star will become real tree.
Step 8: Look back to use the Custom Sharp Tool (U) and look for a Christmas snow path.
Give white color to the snow and only 40% opacity. And here your last result.
Hope you feel good with it and enjoy your design. Change background or style as you will or drop me a comment if you have doubt.
05 October 2010
Make a simple logo in Offset Path Object of Illustrator Tool
let's me show you how easy way to make a company logo just only 3 to 4 steps. I used LOGO as my design but for you it is possible to use your own style.
Let's start it right away.
Press T for text to type LOGO and make it a copy and hide it. Then work with the appear one. Right click on that LOGO and select Create Outline. So your text will become an object.

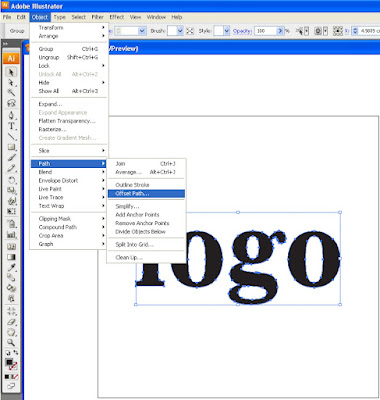
Go to Object Menu => Path => Offset Path...
A dialog is appeared. Set size Offset to 0.35cm, Joins: Miter and Miter limit: 4
And you logo will become bigger. Give it as red color. Then do it the same to other Logo object and make it bigger then this red on.
Once you did. We don't have to give any foreground color but a black stroke should be here. See Logo below.
Unhidden the LOGO wording and white color. Here we have a result.

Hope you are mostly easy understand this tutorial and leave me a thanks comment.
Let's start it right away.
Press T for text to type LOGO and make it a copy and hide it. Then work with the appear one. Right click on that LOGO and select Create Outline. So your text will become an object.

Go to Object Menu => Path => Offset Path...

A dialog is appeared. Set size Offset to 0.35cm, Joins: Miter and Miter limit: 4
And you logo will become bigger. Give it as red color. Then do it the same to other Logo object and make it bigger then this red on.
Once you did. We don't have to give any foreground color but a black stroke should be here. See Logo below.
Unhidden the LOGO wording and white color. Here we have a result.

Hope you are mostly easy understand this tutorial and leave me a thanks comment.
28 September 2010
Vector 3D Star Icon Design in Illustrator
Hi every one as in my previous post I did to mention some of the 3D Tool both in Photoshop and Illustrator. And now I like to show you another easy way to make a 3D star Icon in Illustrator as you see it below.
 Start up your Illustrator now and make a new document size 10 x 10 cm. Then select Rounded Rectangle Tool then draw this below.
 Back to Star Tool draw it in the middle of Rounded object (please remember to make copy of this Star Object you might need to use it after this). Press Ctrl+Shift+F9 to view the PathFinder or if you want to remember it just go=> Window menu => PathFinder. Select both of these object (Rounded and star) and press Exclude Overlapping Sharp Areas and press expand right after these 2 objects become one object.
 Alright now we have a rounded object which is star whole in the middle. Make it 3D go => Effect Menu => 3D => Extrude and Bavel
 A dialog is appeared once you select as what I told you. You don't have to edit it all just seethe red cycle 22 green -26 blue 8 and the Extrude Depth is 20
 Then here is the 3D Star Rounded.
 Remember I told you to copy the Star Object. Now it is time to use and do it the same way as above option. After you done it duplicate this Star into 2 and expand one of it. For me I use left object and hide the right one. To do that just follow here. Select left star object and go to Object Menu=> Expand Appearance.

Then un-group it all or just double click and delete 3D shadow of this star. Let's name it a Black Star.

With this Black Star please un-fill its color (just leave it blank) and apply the Black Star Stroke in white color.

Go to Object Menu=>Path=>Offset Path... We make this Offset Path is to resize its stroke in a fit size of a star. Sorry because my English is still poor. Some of you might not understand please contact me via my email at chetsary@gmail.com or drop me a comment.

Here our 3D Star Rounded result.

Now you will see some style to make the 3D Star Rounded appear clearly. To do that just select the 3D Star Rounded (except the white star stroke). Expand it now go to Object Menu => Expand Appearance. Double click and select the All 3D Shadow => Ctrl+Shift+F9 in the Pathfinder box => Add to shape area do like this is to merge that Shadow to become 1 Shadow then Gradient in a bit black color. Same way to front part of the Star.

Open up the right 3D which we had hired it and using the same way of making 3D Style and option. Style as what you want. The below is the final result.

How do you enjoy this post. I know it is a simple design but every one must start from the beggining. Have you say somethings yet to this tutorial. Drop me a comment and subscripe to my comment to get my latest reply. Thanks for tuning and keep stay back to me.
 Start up your Illustrator now and make a new document size 10 x 10 cm. Then select Rounded Rectangle Tool then draw this below.
 Back to Star Tool draw it in the middle of Rounded object (please remember to make copy of this Star Object you might need to use it after this). Press Ctrl+Shift+F9 to view the PathFinder or if you want to remember it just go=> Window menu => PathFinder. Select both of these object (Rounded and star) and press Exclude Overlapping Sharp Areas and press expand right after these 2 objects become one object.
 Alright now we have a rounded object which is star whole in the middle. Make it 3D go => Effect Menu => 3D => Extrude and Bavel
 A dialog is appeared once you select as what I told you. You don't have to edit it all just seethe red cycle 22 green -26 blue 8 and the Extrude Depth is 20
 Then here is the 3D Star Rounded.
 Remember I told you to copy the Star Object. Now it is time to use and do it the same way as above option. After you done it duplicate this Star into 2 and expand one of it. For me I use left object and hide the right one. To do that just follow here. Select left star object and go to Object Menu=> Expand Appearance.
Then un-group it all or just double click and delete 3D shadow of this star. Let's name it a Black Star.

With this Black Star please un-fill its color (just leave it blank) and apply the Black Star Stroke in white color.

Go to Object Menu=>Path=>Offset Path... We make this Offset Path is to resize its stroke in a fit size of a star. Sorry because my English is still poor. Some of you might not understand please contact me via my email at chetsary@gmail.com or drop me a comment.

Here our 3D Star Rounded result.

Now you will see some style to make the 3D Star Rounded appear clearly. To do that just select the 3D Star Rounded (except the white star stroke). Expand it now go to Object Menu => Expand Appearance. Double click and select the All 3D Shadow => Ctrl+Shift+F9 in the Pathfinder box => Add to shape area do like this is to merge that Shadow to become 1 Shadow then Gradient in a bit black color. Same way to front part of the Star.

Open up the right 3D which we had hired it and using the same way of making 3D Style and option. Style as what you want. The below is the final result.

How do you enjoy this post. I know it is a simple design but every one must start from the beggining. Have you say somethings yet to this tutorial. Drop me a comment and subscripe to my comment to get my latest reply. Thanks for tuning and keep stay back to me.
Subscribe to:
Comments (Atom)


